


一、Spring
1、Spring环境搭建
调整项目环境
- 修改JDK版本
- 修改单元测试版本
- 删除build标签中pluginManagement标签
- 添加Spring框架的依赖坐标
- 添加Spring配置文件
2、SpringIOC的Bean对象实例化模拟
1)定义Bean属性对象
package cn.ken.virtual_ioc;

/**
 * myBean对象
 * 用来接收配置文件中bean标签的id和class属性值
 */
public class MyBean {
    private String id;
    private String clazz;

    public MyBean(String id, String clazz){
        this.id = id;
        this.clazz = clazz;
    }

    public MyBean() {
    }

    public String getId() {
        return id;
    }

    public void setId(String id) {
        this.id = id;
    }

    public String getClazz() {
        return clazz;
    }

    public void setClazz(String clazz) {
        this.clazz = clazz;
    }
}
2)添加dom4j坐标依赖
用于解析配置文件
<dependency>
  <groupId>dom4j</groupId>
  <artifactId>dom4j</artifactId>
    <version>1.6.1</version>
</dependency>
<dependency>
  <groupId>jaxen</groupId>
  <artifactId>jaxen</artifactId>
  <version>1.1.6</version>
</dependency>
3)准备自定义配置文件
<beans>
    <bean id="user" class="cn.ken.pojo.User"/>
</beans>
4)定义Bean工厂接口
package cn.ken.virtual_ioc;

/**
 * 工厂模式
 * 自定义工厂方法
 */
public interface MyFactory {

    // 通过id属性值获取实例化对象
    public Object getBean(String id);
}
5)定义Bean接口的实现类
package cn.ken.virtual_ioc;

import org.dom4j.Document;
import org.dom4j.Element;
import org.dom4j.XPath;
import org.dom4j.io.SAXReader;

import java.net.URL;
import java.util.ArrayList;
import java.util.HashMap;
import java.util.List;
import java.util.Map;

/**
 * 工厂接口实现类
 * 1.通过构造器的形参,传递要解析的配置文件
 * 2.解析配置文件,得到对应的bean标签的id与class属性值,并设置到对应的myBean对象中,存放到list集合里
 * 3.通过遍历list集合,得到每个myBean对象,从中得到属性对应的实例化对象,存放到map集合,通过id与实例化对象
 * 4.通过getBean方法,从map对象中通过id获取对应的value,即实例化对象
 */
public class MyClassPathXmlApplicationContext implements MyFactory{

    //定义map对象,用于存放id属性与对应的class属性实例好的bean对象
    private Map<String, Object> beanMap = new HashMap<>();
    //定义集合,用来存放myBean对象(myBean是用来存放配置文件中bean标签对应的id与class属性值)
    private List<MyBean> beanList = null;

    /**
     * 1.通过构造器的形参,传递要解析的配置文件
     * @param fileName
     */
    public MyClassPathXmlApplicationContext(String fileName) {
        //解析配置文件
        parseXml(fileName);
        //实例化对象
        instanceBean();
    }

    /**
     * 2.解析配置文件,得到对应的bean标签的id与class属性值,并设置到对应的myBean对象中,存放到list集合里
     * @param fileName
     */
    private void parseXml(String fileName) {
        try{
            //得到解析器
            SAXReader saxReader = new SAXReader();
            //得到配置文件对应的url
            URL url = saxReader.getClass().getClassLoader().getResource(fileName);
            //解析配置文件,得到Document对象
            Document document = saxReader.read(url);
            //XPath使用路径表达式来选取XML文档中的节点或节点集
            //定义XPath语法,获取beans标签下所有的bean标签
            XPath xPath = document.createXPath("beans/bean");
            //通过XPath语法,得到对应的bean标签,返回一个Element集合
            List<Element> elementList = xPath.selectNodes(document);
            //判断element集合是否为空
            if(elementList != null && elementList.size() > 0){
                beanList = new ArrayList<>();
                //遍历Element集合,得到Element对象,得到对应的属性值
                for(Element element : elementList){
                    String id = element.attributeValue("id");
                    String clazz = element.attributeValue("class");
                    MyBean myBean = new MyBean(id,clazz);
                    beanList.add(myBean);
                }
            }
        } catch (Exception e){
            e.printStackTrace();
        }
    }

    /**
     * 3.通过遍历list集合,得到每个myBean对象,从中得到属性对应的实例化对象,存放到map集合,通过id与实例化对象
     */
    private void instanceBean() {
        try{
            if(beanList != null && beanList.size() > 0){
                for(MyBean myBean : beanList){
                    String id = myBean.getId();
                    String clazz = myBean.getClazz();
                    //通过反射,实例化指定的class属性值对应的Bean对象
                    Object object = Class.forName(clazz).newInstance();
                    beanMap.put(id,object);
                }
            }
        }catch (Exception e){
            e.printStackTrace();
        }
    }

    /**
     * 4.通过getBean方法,从map对象中通过id获取对应的value,即实例化对象
     * @param id
     * @return
     */
    @Override
    public Object getBean(String id) {
        //通过id属性,从map中获取对应的实例化对象
        Object object = beanMap.get(id);
        return object;
    }
}
6)测试自定义IOC容器
3、SpringIOC配置文件加载
- 通过相对路径加载配置文件
- new ClassPathXmlApplicationContext(“配置文件名”);
- 通过绝对路径加载配置文件
- new FileSystemXmlApplicationContext(“配置文件的绝对路径”);
- 单个配置文件
- new ClassPathXmlApplicationContext(“配置文件名”);
- 多个配置文件
- 通过可变参数,设置多个配置文件
- new ClassPathXmlApplicationContext(“配置文件名1”,“配置文件名2”);
- 设置一个总配置文件,在总配置文件中导入需要加载的配置文件
<import resource="spring.xml"/><import resource="beans.xml"/>
- 通过可变参数,设置多个配置文件
4、SpringIOC容器Bean对象实例化
1)构造器实例化
通过默认构造器创建,空构造方法必须存在,否则创建失败
2)静态工厂实例化
配置文件
<bean id="userService" class="cn.ken.factory.StaticFactory" factory-method="createUserService"></bean>
定义静态工厂类,类中定义静态方法,方法返回实例化的Bean对象
id:需要被实例化的Bean对象的id
class:静态工厂类的类路径
factory-method:静态工厂类中对应的静态方法
当我们指定Spring静态工厂方法来创建Bean实例时,Spring将先解析配置文件,并根据配置文件指定的信息,通过反射调用静态工厂类的静态工厂方法,并将该静态工厂方法的返回值作为Bean实例,在这个过程中,Spring将不再负责创建Bean对象,Bean实例的创建交给用户提供的静态工厂方法。
3)实例化工厂实例化
工厂方法为非静态方法
需要配置工厂Bean,并在业务Bean中配置factory-bean,factory-method属性
<bean id="instanceFactory" class="cn.ken.factory.InstanceFactory"></bean>
<bean id="userService" factory-bean="instanceFactory" factory-method="createUserService"></bean>
定义工厂类,类中定义普通方法,方法返回实例化的Bean对象
factory-bean:对应工厂类的bean标签的id属性值
factory-method:工厂类中的方法
4)Spring三种实例化Bean的方式比较
- 方式一:通过bean的缺省构造函数创建,当各个bean的业务逻辑相互比较独立的时候或者和外界关联较少的时候可以使用
- 方式二:利用静态factory方法创建,可以统一管理各个bean的创建,如各个bean在创建之前需要相同的初始化处理,则可用这个factory方法进行统一的处理等等
- 方式三:利用实例化factory方法创建,即将factory方法也作为了业务bean来控制,一方面可以用于继承其他框架的bean创建管理方法,另一方面能够使bean和factory的角色互换
4、SpringIOC手动注入
<bean id="userDao" class="cn.ken.dao.impl.UserDaoImpl"></bean>
<bean id="userService" class="cn.ken.service.impl.UserServiceImpl">
    <property name="userDao" ref="userDao"></property>
</bean>
5、SpringIOC自动注入
@Autowired注解会按照数据类型从Spring容器中自动进行匹配,如果UserDao只有一个实现的Bean,则@Qualifier注解可以省略
即@Autowired是按照类型自动匹配的,@Qualifier是按照id进行匹配的(当有多个实现的Bean时就需要加上这个注解来选择使用哪个Bean注入,且此注解不能单独使用,得配合@Autowired一起使用)
当需要通过id匹配时也可以直接使用@Resource注解,则直接写@Resource(name="userDao")就行(相当于@Autowired + @Qualifier(“userDao”))
如果使用注解配置可以不用set方法,注解标志处会通过暴力反射直接为该field赋值,不需要set方法
6、SpringIOC扫描器
<?xml version="1.0" encoding="UTF-8"?>
<beans xmlns="http://www.springframework.org/schema/beans"
       xmlns:xsi="http://www.w3.org/2001/XMLSchema-instance"
       xmlns:context="http://www.springframework.org/schema/context"
       xsi:schemaLocation="http://www.springframework.org/schema/beans http://www.springframework.org/schema/beans/spring-beans.xsd
       http://www.springframework.org/schema/context http://www.springframework.org/schema/context/spring-context.xsd">

    <context:component-scan base-package="cn.ken"/>

</beans>
7、SpringIOC中Bean对象的作用域与生命周期
默认情况下,我们从Spring容器中拿到的对象均是单例的,对于bean的作用域类型如下:
Singleton作用域
<bean id="bean1" class="..." lazy-init="true"/>
注意:lazy-init是懒加载,如果等于true时作用是指Spring容器启动时不回去实例化这个bean,而是在程序去调用时才去实例化,默认是false即Spring容器启动时加载
默认情况下,被管理的bean只会在IOC容器中存在一个实例,对于所有获取该bean的操作Spring容器将只返回同一个bean
设置为lazy-init的好处:
- 可以提前发现潜在的配置问题
- bean对象存在于缓存中,使用时不用再去实例化bean,加快程序运行效率
什么对象适合作为单例对象
一般来说对于无状态或状态不可改变的对象适合使用单例模式(不存在会改变对象状态的成员变量比如Controller层、service层和dao层)。实际上对象状态的变化往往均是由属性值的变化而引起的,比如user类姓名属性会有变化,属性姓名的变化一般会引起user对象状态的变化。对于我们的程序来说,无状态对象没有实例变量的存在,保证了我们线程的安全,service层业务对象即是无状态对象,线程安全的。
prototype作用域
<bean id=".." class="..." scope="prototype"
通过scope=“prototype”设置bean的类型,每次向Spring容器请求获取bean都返回一个全新的bean,相对于singleton来说就是不缓存bean,每次都是一个根据bean定义创建的全新的bean
bean的销毁
- 指定bean对象销毁所执行的方法
<bean id=".." class="..." destroy-method=",,,"/>
- 通过AbstractApplicationContext对象,调用其close方法实现bean的销毁过程
8、SpringTask定时任务
在项目开发中定时任务是一种比较常见的需求,主要用三种解决方案:一是使用JDK自带的Timer,二是使用第三方组件Quartz,第三是使用Spring Task
两种解决方法:
- XML配置
- 注解配置
<task:scheduled-tasks>
    <task:scheduled ref="taskJob" method="job1" cron="0/2 * * * * ?"/>
</task:scheduled-tasks>
<!--注解开发-->
<task:annotation-driven/>
@Scheduled(cron = "2,4,6,10 * * * * *")
9、SpringAop静态代理
为某一个对象(委托类)提供一个代理(代理类),用来控制对这个对象的访问。委托类和代理类有一个共同的父类或父接口。代理类会对请求做预处理、过滤,将请求分配给指定对象。
代理模式有俩个设计原则:
代理类和委托类具有相似的行为
代理类增强委托类的行为
public class StaticsProxyStarter {
    public static void main(String[] args) {
        Marry people = new ToMarry();
        //通过代理类完成委托类目标
        MarryProxy proxy = new MarryProxy(people);
        proxy.toMarry();;
    }
}
//代理类
public class MarryProxy implements Marry {
    private Marry people;

    public MarryProxy(Marry people) {
        this.people = people;
    }

    public void toMarry() {
        //增强行为
        System.out.println("场景布置");
        System.out.println("音乐布置");
        people.toMarry();//实现委托类目标行为
        System.out.println("后续内容");
    }
}
//委托类
public class ToMarry implements Marry {
    public void toMarry() {
        System.out.println("结婚");
    }
}
//共同行为
public interface Marry {
    void toMarry();
}
要素
- 有共同的行为(结婚):接口
- 目标角色(要结婚的人):实现行为
- 代理角色(婚庆公司):实现行为 增强目标对象行为
特点
- 目标角色固定
- 在应用程序执行前就得到目标角色
- 代理对象会增强目标对象的行为
- 有可能存在多个代理,引起“类爆炸”(缺点)
10、SpringAop JDK动态代理
相比于静态代理,动态代理在创建代理对象上更加的灵活,动态代理类的字节码在程序的运行时,由Java的反射机制动态产生。它会根据需要,通过反射机制在程序运行期,动态的为目标对象创建代理对象,无需程序员手动编写它的源代码。动态代理不仅简化了编程工作,而且提高了软件系统的可拓展性,因为反射机制可以生成任意类型的动态代理类。它的行为可以代理多个方法,即满足生产需要的同时又达到代码通用的目的。
特点:
- 目标对象不确定
- 在应用程序执行时动态创建目标对象
- 代理对象会增强目标对象的行为
JDK动态代理的目标对象必须有接口实现
public class JdkProxy {
    //目标对象
    private Object target;

    public JdkProxy(Object target) {
        this.target = target;
    }

    public Object getProxy(){
        ClassLoader classLoader = this.getClass().getClassLoader();
        Class[] interfaces = target.getClass().getInterfaces();
        InvocationHandler invocationHandler = new InvocationHandler() {
            public Object invoke(Object proxy, Method method, Object[] args) throws Throwable {
                System.out.println("准备事宜");
                Object result = method.invoke(target, args);
                System.out.println("结婚后");
                return result;
            }
        };
        Object object = Proxy.newProxyInstance(classLoader, interfaces, invocationHandler);
        return object;
    }
}
public class JdkProxyStarter {
    public static void main(String[] args) {
        Marry marry = new ToMarry();
        JdkProxy jdkProxy = new JdkProxy(marry);
        Marry proxy = (Marry) jdkProxy.getProxy();
        proxy.toMarry();
    }
}
11、SpringAop CGLIB动态代理
JDK的动态代理机制只能代理实现了接口的类,而不能实现接口的类就不能用JDK动态代理,CGLIB是针对类来实现代理的(接口也可以),它的原理是对指定的目标类生成一个子类,并覆盖其中方法实现增强,所以不能对final修饰的类进行代理。
添加依赖
<dependency>
  <groupId>cglib</groupId>
  <artifactId>cglib</artifactId>
  <version>3.3.0</version>
</dependency>
package cn.ken.start;

import cn.ken.common.Marry;
import cn.ken.common.User;
import cn.ken.cust.ToMarry;
import cn.ken.proxy.CGLibProxy;

public class CGLibProxyStarter {
    public static void main(String[] args) {
//        Marry marry = new ToMarry();
//        CGLibProxy cgLibProxy = new CGLibProxy(marry);
//        Marry proxy = (Marry) cgLibProxy.getProxy();
//        proxy.toMarry();
        User user = new User();
        CGLibProxy cgLibProxy = new CGLibProxy(user);
        User proxy = (User) cgLibProxy.getProxy();
        proxy.test();
    }
}
package cn.ken.proxy;

import net.sf.cglib.proxy.Enhancer;
import net.sf.cglib.proxy.MethodInterceptor;
import net.sf.cglib.proxy.MethodProxy;

import java.lang.reflect.Method;

public class CGLibProxy {

    private Object target;

    public CGLibProxy(Object target) {
        this.target = target;
    }

    public Object getProxy(){
        //通过Enhancer对象的creat方法可以生成一个类,用于生成代理对象
        Enhancer enhancer = new Enhancer();
        //设置当前类的父类(将目标类作为代理类的父类)
        enhancer.setSuperclass(target.getClass());
        //定义MethodInterpret方法拦截器
        MethodInterceptor methodInterceptor = new MethodInterceptor() {
            /**
             *
             * @param o 由CGLib动态生成的代理类实例
             * @param method 实体类所调用的被代理的方法的引用
             * @param objects 参数值列表
             * @param methodProxy 生成的代理类对方法的代理引用
             * @return
             * @throws Throwable
             */
            public Object intercept(Object o, Method method, Object[] objects, MethodProxy methodProxy) throws Throwable {
                System.out.println("before");
                Object result = method.invoke(target, objects);
                System.out.println("after");
                return result;
            }
        };
        //设置代理过程(调用目标对象方法,增强用户行为)
        enhancer.setCallback(methodInterceptor);
        //生成一个类
        return enhancer.create();
    }
}
12、SpringAop的注解实现
AOP面向切面编程,相比较于oop面向对象编程来说,AOP关注的不再是程序代码中某个类、某个方法,而AOP考虑的更多是一种面到面的切入,即层与层之间的一种切入,所以称之为切面。
AOP主要应用于日志记录,性能统计,安全控制,事务处理等方面,实现公共功能性的重复使用。
AOP的特点
- 降低模块与模块之间的耦合度,提高业务代码的聚合度(高内聚低耦合)
- 提高了代码的复用性
- 提高了系统的扩展性(高版本兼容低版本)
- 可以在不影响原有功能的基础上添加新功能
底层实现
动态代理(JDK+CGLIB)
概念
- 切入点:对拦截的定义,规定拦截哪些方法,对哪些方法进行处理
- 通知:拦截到每一个切入点后需要做的操作
- 切面:切入点与通知的结合
环境搭载
-
坐标依赖引入
-
<dependency>
  <groupId>org.aspectj</groupId>
  <artifactId>aspectjweaver</artifactId>
  <version>1.9.5</version>
</dependency>
-
-
添加spring.xml的配置
-
xmlns:aop="http://www.springframework.org/schema/aop"
http://www.springframework.org/schema/aop http://www.springframework.org/schema/aop/spring-aop.xsd -
<aop:aspectj-autoproxy/>
-
package cn.ken.aspect;

import org.aspectj.lang.ProceedingJoinPoint;
import org.aspectj.lang.annotation.*;
import org.springframework.stereotype.Component;

/**
 * 定义切面
 *      切面是 切入点 与 通知 的结合
 *      在切面类中定义切入点与通知:
 *          切入点:定义规则,定义切面要拦截哪些类哪些方法
 *          通知:方法拦截后要做什么事情
 */
@Component//交给IOC容器管理
@Aspect//声明切面类
public class LogCut {

    /**
     * 定义切入点
     *  通过@Pointcut定义规则
     *      1、拦截所有方法
     *          @Pointcut("execution(* *(..))")
     *      2、拦截所有公用的set方法
     *          @Pointcut("execution(public set*(..))")
     *      3、拦截service包下面的所有类的所有方法
     *          @Pointcut("execution(* cn.ken.service.*.*(..))")
     *      4、拦截service包及其子包下的所有类的所有方法
     *          @Pointcut("execution(* cn.ken.service..*.*(..))")
     *  规则表达式的第一个位置表示方法的修饰范围
     */
    @Pointcut("execution(* cn.ken.service..*.*(..))")
    public void cut(){}

    /**
     * 前置通知 应用在指定切入点上
     * 在目标方法执行之前
     */
    @Before(value = "cut()")
    public void before(){
//        System.out.println("前置通知");
    }

    /**
     * 返回通知 应用在指定切入点上
     * 在目标方法无异常返回后执行
     */
    @AfterReturning(value = "cut()")
    public void afterReturning(){
//        System.out.println("返回通知");
    }

    /**
     * 最终通知 应用在指定切入点上
     * 在目标方法执行后(无论是否出现异常)执行
     */
    @After(value = "cut()")
    public void after(){
//        System.out.println("最终通知");
    }

    /**
     * 异常通知 应用在指定切入点上
     * 在目标方法执行异常时执行
     */
    @AfterThrowing(value = "cut()", throwing = "e")
    public void afterThrowing(Exception e){
//        System.out.println("异常通知,原因:" + e.getMessage());
    }

    /**
     * 环绕通知 应用在指定切入点上
     * 方法执行前后 通过环绕通知定义相应处理
     *      需要通过显示调用对应的方法,否则无法访问指定的方法(proceedingJoinPoint.proceed();)
     * @param proceedingJoinPoint
     * @return
     */
    @Around(value = "cut()")
    public Object around(ProceedingJoinPoint proceedingJoinPoint){
        System.out.println("前置通知");
        Object result = null;
        try{
            result = proceedingJoinPoint.proceed();
            System.out.println("返回通知");
        } catch (Throwable e) {
            System.out.println("异常通知");
            e.printStackTrace();
        } finally {
            System.out.println("最终通知");
        }
        return result;
    }
}
public class AopStarter {
    public static void main(String[] args) {
        ApplicationContext applicationContext = new ClassPathXmlApplicationContext("spring.xml");
        UserService userService = applicationContext.getBean("userService", UserService.class);
        userService.test();
        userService.test1();
    }
}
@Service
public class UserService {
    @Resource
    private UserDao userDao;

    public void test(){
        System.out.println("service...");
    }

    public void test1(){
        int i = 1/0;
        System.out.println("service...");
    }
}
13、SpringAop的XML实现
LogCut类只需要@Component注解不需要@Aspect注解
<!--aop相关配置-->
<aop:config>
    <!--aop切面-->
    <aop:aspect ref="logCut">
        <!--定义aop切入点-->
        <aop:pointcut id="cut" expression="execution(* cn.ken.service..*.*(..))"/>
        <!--定义通知-->
        <aop:before method="before" pointcut-ref="cut"/>
        <aop:after method="after" pointcut-ref="cut"/>
        <aop:around method="around" pointcut-ref="cut"/>
        <aop:after-throwing method="afterThrowing" throwing="e" pointcut-ref="cut"/>
    </aop:aspect>
</aop:config>
14、Spring继承Mybatis框架
maven配置文件
<build>
<!--
  Maven项目:如果源代码src/main/java存在xml,properties,tld文件
  maven不会自动编译该文件到输出目录,如果要编译源代码中xml,properties,tld文件
  需要显示配置resources标签
-->
  <resources>
    <resource>
      <directory>src/main/resources</directory>
    </resource>
    <resource>
      <directory>src/main/java</directory>
      <includes>
        <include>**/*.xml</include>
        <include>**/*.properties</include>
        <include>**/*.tld</include>
      </includes>
      <filtering>false</filtering>
    </resource>
  </resources>
</build>
spring配置文件
<?xml version="1.0" encoding="UTF-8"?>
<beans xmlns="http://www.springframework.org/schema/beans"
       xmlns:xsi="http://www.w3.org/2001/XMLSchema-instance"
       xmlns:aop="http://www.springframework.org/schema/aop"
       xmlns:context="http://www.springframework.org/schema/context"
       xmlns:tx="http://www.springframework.org/schema/tx"
       xsi:schemaLocation="http://www.springframework.org/schema/beans http://www.springframework.org/schema/beans/spring-beans.xsd
           http://www.springframework.org/schema/aop http://www.springframework.org/schema/aop/spring-aop.xsd
           http://www.springframework.org/schema/tx http://www.springframework.org/schema/tx/spring-tx.xsd
           http://www.springframework.org/schema/context http://www.springframework.org/schema/context/spring-context.xsd">

    <context:component-scan base-package="cn.ken"/>

    <aop:aspectj-autoproxy/>

<!--  加载properties配置文件,使得下面bean的配置可以使用${}  -->
    <context:property-placeholder location="db.properties"/>

    <bean id="dataSource" class="com.alibaba.druid.pool.DruidDataSource">
        <property name="driver" value="${jdbc.driver}"/>
        <property name="url" value="${jdbc.url}"/>
        <property name="username" value="${jdbc.username}"/>
        <property name="password" value="${jdbc.password}"/>
    </bean>

<!--  配置事务管理器  -->
    <bean id="txManager" class="org.springframework.jdbc.datasource.DataSourceTransactionManager">
        <property name="dataSource" ref="dataSource"/>
    </bean>

<!--  设置事务增强  -->
    <tx:advice id="txAdvice" transaction-manager="txManager">
        <tx:attributes>
            <tx:method name="add*" propagation="REQUIRED"/>
            <tx:method name="insert*" propagation="REQUIRED"/>
            <tx:method name="update*" propagation="REQUIRED"/>
            <tx:method name="delete*" propagation="REQUIRED"/>
        </tx:attributes>
    </tx:advice>

<!--  aop切面配置  -->
    <aop:config>
        <aop:pointcut id="servicePointcut" expression="execution(* cn.ken.service..*.*(..))"/>
        <aop:advisor advice-ref="txAdvice" pointcut-ref="servicePointcut"/>
    </aop:config>

<!--  配置sqlSessionFactory  -->
    <bean id="sqlSessionFactory" class="org.mybatis.spring.SqlSessionFactoryBean">
        <property name="dataSource" ref="dataSource"/>
        <property name="configLocation" value="classpath:mybatis.xml"/>
        <property name="mapperLocations" value="classpath:cn/ken/mapper/*.xml"/>
    </bean>

<!--  配置扫描器  -->
    <bean id="mapperScanner" class="org.mybatis.spring.mapper.MapperScannerConfigurer">
<!--    扫描dao包及其子包下的所有映射接口类    -->
        <property name="basePackage" value="cn.ken.dao"/>
        <property name="sqlSessionFactoryBeanName" value="sqlSessionFactory"/>
    </bean>
</beans>
mybatis配置文件
<?xml version="1.0" encoding="UTF-8" ?>
<!DOCTYPE configuration PUBLIC "-//mybatis.org//DTD Config 3.0//EN"
        "http://mybatis.org/dtd/mybatis-3-config.dtd">
<configuration>
<!--定义类别名-->
    <typeAliases>
        <package name="cn.ken.pojo"/>
    </typeAliases>
</configuration>
数据库配置文件
jdbc.driver=com.mysql.cj.jdbc.Driver
jdbc.url=jdbc:mgsql://localhost:3306/test?useUnicode=true&characterEncoding=utf8&serverTimezone=GMT%2B8&useSSL=false
jdbc.username=root
jdbc.password=129496
mapper配置文件
<?xml version="1.0" encoding="UTF-8"?>
<!DOCTYPE mapper PUBLIC "-//mybatis.org//DTD Mapper 3.0//EN" "http://mybatis.org/dtd/mybatis-3-mapper.dtd">
<mapper>

</mapper>
15、Spring事务
xml配置事务
<!--  配置事务管理器  -->
    <bean id="txManager" class="org.springframework.jdbc.datasource.DataSourceTransactionManager">
        <property name="dataSource" ref="dataSource"/>
    </bean>

<!--  设置事务增强  -->
    <tx:advice id="txAdvice" transaction-manager="txManager">
        <tx:attributes>
            <!--定义什么方法需要使用事务,name代表的是方法名(或方法匹配)-->
            <!--匹配add开头的所有方法均加入事务-->
            <tx:method name="add*" propagation="REQUIRED"/>
            <tx:method name="insert*" propagation="REQUIRED"/>
            <tx:method name="update*" propagation="REQUIRED"/>
            <tx:method name="delete*" propagation="REQUIRED"/>
        </tx:attributes>
    </tx:advice>

<!--  aop切面配置  -->
    <aop:config>
        <aop:pointcut id="servicePointcut" expression="execution(* cn.ken.service..*.*(..))"/>
        <aop:advisor advice-ref="txAdvice" pointcut-ref="servicePointcut"/>
    </aop:config>
注解配置事务
<!--  配置事务管理器  -->
    <bean id="txManager" class="org.springframework.jdbc.datasource.DataSourceTransactionManager">
        <property name="dataSource" ref="dataSource"/>
    </bean>
<!--  配置注解支持  -->
	<tx:annotation-driven transaction-manager="txManager"/>
//在需要添加事务的方法上加入事务注解
@Transactional(propagation = Propagation.REQUIRED)
//如果有事务则加入事务,如果没有则新建事务
两种配置事务的方法可以同时使用,相辅相成
默认spring事务只在发生未被捕获的runtimeException时才回滚
被拦截的方法需要显示抛出异常,并且不能经过任何处理,这样aop代理才能捕获到方法的异常,才能进行回滚
二、SpringMVC
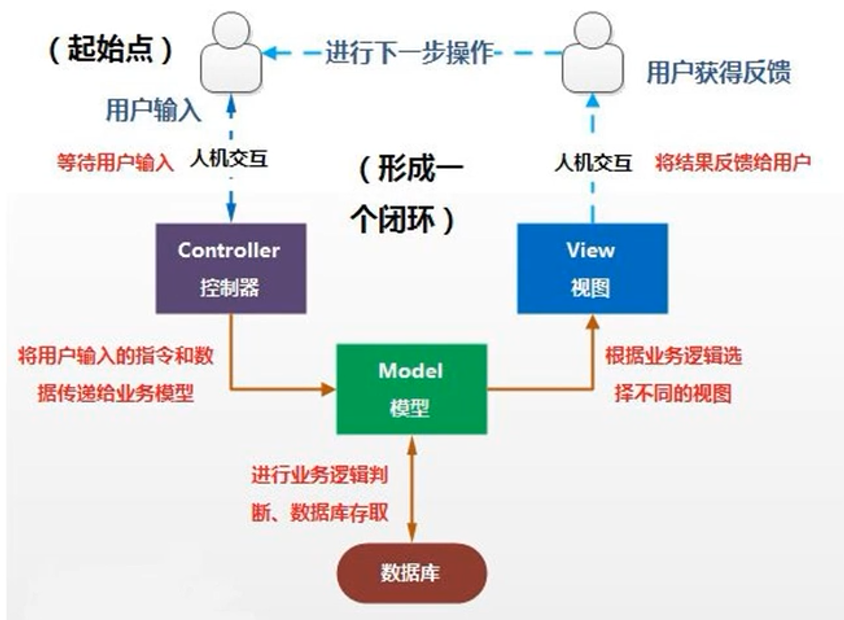
1、MVC思想
模型-视图-控制器(MVC)是一个以设计页面应用程序为基础的设计思想。它主要通过分离模型、试图及控制器在应用程序的角色将业务逻辑从界面中解耦。通常模型负责封装应用程序数据在视图层展示。视图仅仅只是展示这些数据,不包含任何业务逻辑。控制器负责接收来自用户的请求,并调用后台服务(service或者dao)来处理业务逻辑。处理后,后台业务层可能会返回了一些数据在视图层展示。控制器收集这些数据以及准备模型在视图层展示。MVC模式的核心思想是将业务逻辑从界面中抽离出来,允许他们单独改变而不会相互影响。
2、SpringMVC概念和特点
是一个基于请求驱动的Web框架
servlet-context.xml
<?xml version="1.0" encoding="UTF-8"?>
<beans xmlns="http://www.springframework.org/schema/beans"
       xmlns:xsi="http://www.w3.org/2001/XMLSchema-instance"
       xmlns:mvc="http://www.springframework.org/schema/mvc"
       xmlns:context="http://www.springframework.org/schema/context"
       xsi:schemaLocation="http://www.springframework.org/schema/beans http://www.springframework.org/schema/beans/spring-beans.xsd
       http://www.springframework.org/schema/mvc http://www.springframework.org/schema/mvc/spring-mvc.xsd
       http://www.springframework.org/schema/context http://www.springframework.org/schema/context/spring-context.xsd">

    <context:component-scan base-package="cn.ken.controller"/>

<!--  开启注解驱动  -->
    <mvc:annotation-driven/>

<!--  使用默认的servlet来响应静态文件  -->
    <mvc:default-servlet-handler/>

<!--  配置视图解析器  -->
    <bean class="org.springframework.web.servlet.view.InternalResourceViewResolver" id="internalResourceViewResolver">
<!--    前缀:在WEB-INF目录下的jsp目录下    -->
        <property name="prefix" value="/WEB-INF/jsp/"/>
        <property name="suffix" value=".jsp"/>
    </bean>

</beans>
web.xml
<!DOCTYPE web-app PUBLIC
 "-//Sun Microsystems, Inc.//DTD Web Application 2.3//EN"
 "http://java.sun.com/dtd/web-app_2_3.dtd" >

<web-app>
  <display-name>Archetype Created Web Application</display-name>

<!-- 编码过滤 -->
  <filter>
    <filter-name>encodingFilter</filter-name>
    <filter-class>org.springframework.web.filter.CharacterEncodingFilter</filter-class>
    <init-param>
      <param-name>encoding</param-name>
      <param-value>UTF-8</param-value>
    </init-param>
  </filter>
  <filter-mapping>
    <filter-name>encodingFilter</filter-name>
    <url-pattern>/*</url-pattern>
  </filter-mapping>

<!-- servlet请求分发器,中央处理器 -->
  <servlet>
    <servlet-name>springMvc</servlet-name>
    <servlet-class>org.springframework.web.servlet.DispatcherServlet</servlet-class>
    <init-param>
      <param-name>contextConfigLocation</param-name>
      <param-value>classpath:servlet-context.xml</param-value>
    </init-param>
<!--  表示启动容器时初始化该Servlet,否则是调用时初始化  -->
    <load-on-startup>1</load-on-startup>
  </servlet>
  <servlet-mapping>
    <servlet-name>springMvc</servlet-name>
<!--  这是拦截请求,“/”表示拦截所有请求,“*.do”表示拦截所有.do请求  -->
    <url-pattern>/</url-pattern>
  </servlet-mapping>
</web-app>
EL表达式失效
这个问题是由于 版本 太高导致的,在 JSP2.0 时,增加了 EL 语言,我们可以通过 EL 语言,实现获取数据,进一步将 Servlet 的代码从 JSP 页面中分离出来。而 EL 语言给大家带来了方便。但有时也会遇到 EL 表达式不能显示的情况。
在 2.0 到 2.4 版本它是默认支持 EL 表达式的,如果使用 2.5 版本,默认 EL 表达式是关闭的,我们需要开启才可以使用。
解决方法:
换成 2.0 ~ 2.4 之间的版本或在页面中加入<%@ page isELIgnored=“false” %>
3、请求转发
/**
 * 重定向与请求转发
 * SpringMVC内部默认采用请求转发形式
 *  请求转发
 *      地址栏不发生改变,以forward: 开头
 *      方法有两种返回值
 *      1、返回ModelAndView对象
 *      2、返回视图名称字符串
 *      注:默认都会从视图解析器设置的路径下查找指定视图(不需要设置视图后缀,直接写视图名),如果想从项目的根目录(如果有类路径,则从类路径)查找,则使用forward:
 *  重定向
 *      地址栏会发生改变,以redirect: 开头
 */
@Controller
@RequestMapping("user")
public class UserController {

    @RequestMapping("view")
    public ModelAndView hello(@RequestParam(name = "uid", defaultValue = "11")Integer id){
        ModelAndView modelAndView = new ModelAndView();
        //设置数据模型
        modelAndView.addObject("key","value");
        //设置试图
        modelAndView.setViewName("hello");
        System.out.println(id);
        return modelAndView;
    }

    @RequestMapping("view1")
    public String view1(){
        return "forward:/WEB-INF/jsp/view1.jsp";
    }

    //转发至控制器需加forward,不用forward被视图解析器加前后缀则无法转发到控制器
    @RequestMapping("view2")
    public String view2(){
        return "forward:view?uid=222";
    }
}
<%--
  Created by IntelliJ IDEA.
  User: Ken-Chy
  Date: 2022/2/23
  Time: 22:45
  To change this template use File | Settings | File Templates.
--%>
<%@ page contentType="text/html;charset=UTF-8" language="java" %>
<%@ page isELIgnored="false" %>
<html>
<head>
    <title>Title</title>
</head>
<body>
<h2>${key}<br>${msg}<br>${param.uid}</h2>
<!--param可以获得url中的参数-->
</body>
</html>
4、重定向
重定向是发一个302状态码给浏览器,浏览器自己去请求跳转的网页,地址栏也会发生改变
/**
     * 重定向:
     *  默认从项目的根目录下查找资源(如果类设置了路径,则从类路径即user开始查找)
     * @param session
     * @return
     */
@RequestMapping("view3")
public String view3(HttpSession session){
    //因为重定向是两次请求,故通过HttpServletRequest设置的值无法在重定向后使用,需要使用session设置值
    session.setAttribute("msg","11211222");
    return "redirect:view";
}

/**
     * 重定向可以传递参数,如果直接传递中文,则无法获取(因为浏览器会将中文参数进行unicode编码)
     * 故需要使用RedirectAttributes对象设置
     * @param attributes
     * @return
     */
@RequestMapping("view4")
public String view4(RedirectAttributes attributes){
    //通过此种方法会自动在重定向时拼接上参数
    attributes.addAttribute("name","张三");
    //不需要自己在下面路径后用问号加参数
    return "redirect:/view111.jsp";
}
5、设置请求域
- 使用ModelAndView对象设置
- addObject(“名”,“值”)
- 使用HttpServletRequest对象设置
- setAttribute(“名”,“值”)
- 使用Model对象设置
- addAttribute(“名”,“值”)
- 使用ModelMap对象设置
- addAttribute(“名”,“值”)
- 使用Map对象设置
- put(“名”,“值”)
6、Json数据开发
<dependency>
  <groupId>com.fasterxml.jackson.core</groupId>
  <artifactId>jackson-annotations</artifactId>
  <version>2.11.4</version>
</dependency>
<dependency>
  <groupId>com.fasterxml.jackson.core</groupId>
  <artifactId>jackson-core</artifactId>
  <version>2.11.4</version>
</dependency>
<dependency>
  <groupId>com.fasterxml.jackson.core</groupId>
  <artifactId>jackson-databind</artifactId>
  <version>2.11.4</version>
</dependency>
<!--  开启注解驱动  -->
    <mvc:annotation-driven>
<!--   mvc 请求映射 处理器与适配器配置   -->
<!--   用于将返回值转换为json   -->
        <mvc:message-converters>
            <bean class="org.springframework.http.converter.StringHttpMessageConverter"></bean>
            <bean class="org.springframework.http.converter.json.MappingJackson2HttpMessageConverter"></bean>
        </mvc:message-converters>
    </mvc:annotation-driven>
/**
 * Json数据开发
 * @ResponseBody:
 *      设置在方法级别或者方法的类型前
 *      默认控制器中方法的返回值是会去找对应的视图页面,如果想要返回数据,需要将返回的结果转换成字符串响应(加上JsonConverter
 *      则转换成json字符串)
 * @RequestBody:
 *      设置在形参前
 *      要求传递的参数是一个Json格式的字符串(字符串!!!)
 */
@Controller
@RequestMapping("json")
public class JsonController {

    @RequestMapping("json1")
    @ResponseBody
    public User json(){
        User user = new User("xxx","ssss");
        return user;
    }

    @RequestMapping("json2")
    @ResponseBody
    public User json2(User user){
        return user;
    }
}
<html>
<body>
<h2>Hello World!</h2>
</body>
<script type="text/javascript" src="jquery.js"></script>
<script type="text/javascript">
    $.ajax({
        type:"get",
        url:"json/json2",
        // 此data是发送到服务器的数据
        data:{
            "name":"admin",
            "password":"129496"
        },
        //此data是服务器的返回数据
        success:function (data){
            console.log(data)
        }
    })
</script>
</html>
7、拦截器实现
<!--  拦截器配置:方式一  -->
    <mvc:interceptors>
<!--    使用bean定义一个Interceptor,拦截所有请求    -->
        <bean class="cn.ken.MyInterceptor"></bean>
    </mvc:interceptors>

<!--  拦截器配置:方式二(推荐使用)  -->
    <mvc:interceptors>
<!--    定义在mvc:interceptor下面,可以自定义拦截请求,如果有多个拦截器满足拦截处理的要求,则依据配置的先后顺序来执行    -->
        <mvc:interceptor>
<!--    通过mvc:mapping配置需要拦截的资源,支持通配符,可以配置多个        -->
            <mvc:mapping path="/**"/> <!--"/**"表示拦截所有的请求-->
<!--    配置不需要拦截的资源,支持通配符,可以配置多个        -->
            <mvc:exclude-mapping path="/json/*"/><!--放行json下的路径,即不会经过拦截器处理-->
            <bean class="cn.ken.MyInterceptor"></bean>
        </mvc:interceptor>
    </mvc:interceptors>
</beans>
实现方法一:实现HandlerInterceptor接口
public class MyInterceptor implements HandlerInterceptor {
    //在目标方法(Handler)执行之前执行
    @Override
    public boolean preHandle(HttpServletRequest request, HttpServletResponse response, Object handler) throws Exception {
        System.out.println("11");
        return true;
    }

    //在目标方法实行之后,视图生成之前
    @Override
    public void postHandle(HttpServletRequest request, HttpServletResponse response, Object handler, ModelAndView modelAndView) throws Exception {
        System.out.println("22");
    }

    //在视图生成之后执行
    @Override
    public void afterCompletion(HttpServletRequest request, HttpServletResponse response, Object handler, Exception ex) throws Exception {
        System.out.println("33");
    }
}
实现方法二:继承HandlerInterceptorAdapter类
如果多个拦截器同时生效,则先配置的先执行
先配置的拦截其中对应的preHandle方法限制性,postHandle和afterCompletion后执行
8、文件上传
<dependency>
  <groupId>commons-fileupload</groupId>
  <artifactId>commons-fileupload</artifactId>
  <version>1.3.2</version>
</dependency>
<!--  文件上传  -->
    <bean class="org.springframework.web.multipart.commons.CommonsMultipartResolver" id="multipartResolver">
<!--    允许文件上传的最大尺寸    -->
        <property name="maxUploadSize">
            <value>104857600</value>
        </property>
<!--    将文件放入临时文件夹的最大大小限制,此值是阈值,如果大于则在硬盘生成临时文件,否则存在内存    -->
        <property name="maxInMemorySize">
            <value>4096</value>
        </property>
    </bean>
<%@ page contentType="text/html;charset=UTF-8" language="java" %>
<html>
<head>
    <title>Title</title>
</head>
<body>
<%--
    文件上传表单:
        表单的提交方式:post
        表单的类型:普通表单,二进制表单(enctype="multipart/form-data")
        设置文件域的name属性值
--%>
<form method="post" action="upload" enctype="multipart/form-data">
    文件:<input name="myfile" type="file">
    <button>上传</button>
</form>
</body>
</html>
@Controller
public class UploadController {

    /**
     * 文件上传
     *      在形参上使用@RequestParam("myfile")MultipartFile file接收上传的文件
     *      其中myfile代表的是表单元素的name属性值
     */
    @RequestMapping("upload")
    public String upload(HttpServletRequest request, @RequestParam("myfile")MultipartFile file){
        if (file.isEmpty()){
            request.setAttribute("msg","请上传文件");
            return "result";
        }
        //得到上传的文件名
        String name = file.getOriginalFilename();
        //截取文件名获得后缀
        String siffx = name.substring(name.lastIndexOf("."));
        //生成随机文件名
        String filename = System.currentTimeMillis() + siffx;

        //得到项目的真实路径
        String realPath = request.getServletContext().getRealPath("/");
        //设置文件的存放路径
        File filePath = new File(realPath+"/upload");
        //判断文件是否存在
        if (!filePath.exists()){
            filePath.mkdir();
        }

        try {
            file.transferTo(new File(filePath, filename));
            request.setAttribute("msg","文件上传成功");
        } catch (IOException e){
            request.setAttribute("msg","文件上传失败");
            e.printStackTrace();
        }
        return "result";
    }
}
9、RESTFUL URL设计风格
Restful风格的API是一种软件架构风格,设计风格而不是标准,只是提供了一组设计原则和约束条件。它主要用于客户端和服务器交互类的软件,基于这个设计风格设计的软件可以更简洁、更有层次,更易于实现缓存等机制
在Restful风格中,用户请求的url使用同一个url,请求方式采用get、post、delete、put等方式对请求的处理方法进行分类,这样可以在前后台分离式的开发中使得前端开发人员不会对请求的资源地址产生混淆和大量额检查方法名的麻烦,形成一个统一的接口
/**
 * Get请求:GetMapping("路径") 查询操作 == @RequestMapping(value="路径", method="RequestMethod.GET)
 * Post请求:PostMapping("路径") 添加操作 == @RequestMapping(value="路径", method="RequestMethod.POST)
 * Delete请求:DeleteMapping("路径") 删除操作 == @RequestMapping(value="路径", method="RequestMethod.DELETE)
 * Put请求:PutMapping("路径") 修改操作 == @RequestMapping(value="路径", method="RequestMethod.PUT)
 *
 * 设置请求的参数:
 *      1.路径参数:
 *          在对应的注解上,设置路径时,在路径后面通过{}设置参数名,用于接受请求地址上的路径参数
 *          在方法事务形参前设置@PathVariable注解,表示当前形参是一个路径参数(形参名和{}里对应的参数名应该一致)
 *      2,Json格式的参数
 *          使用RequestBody注解声明形参,表示该参数接受一个Json字符串的参数
 *      3.表单参数
 *
 *  设置响应参数
 *      响应Json格式的数据
 *          使用@ResponseBody注解声明在方法级别,表示该方法返回Json格式的数据
 *
 *  RESTFUL URL路径中不应该包含任何动作行为
 */
@Controller
public class UserController {

//    @Autowired
//    private UserService userService;

    @GetMapping("user/{id}")
    @ResponseBody
    public User queryUser(@PathVariable Integer id){
        System.out.println(id);
        return new User();
    }

    @PostMapping("user")
    @ResponseBody
    public Map<String,Object> addUser(@RequestBody User user){
        Map<String, Object> map = new HashMap<>();
//        if(userService.addUser(user)>0){
//            map.put("status","200");
//            map.put("msg","添加成功");
//        }
        return map;
    }
}
10、全局异常统一处理
使用SpringMVC提供的简单异常处理器SimpleMappingExceptionResolver
使用简单,集成简单,扩展性好,对代码没有入侵性(即改变原来代码)
但仅能获取到异常信息,若在出现异常时,对需要获取异常以外的数据的情况不适用
@Service
public class UserServiceImpl implements UserService {
    @Override
    public int addUser(User user) {
//        int i = 1/0; //-->error页面
        if(false){
            throw new BusinessException();
        }
        return 0;
    }
public class BusinessException extends RuntimeException {
    private Integer code=400;
    private String msg="业务异常";

    public Integer getCode() {
        return code;
    }

    public void setCode(Integer code) {
        this.code = code;
    }

    public String getMsg() {
        return msg;
    }

    public void setMsg(String msg) {
        this.msg = msg;
    }
}
    <bean class="org.springframework.web.servlet.handler.SimpleMappingExceptionResolver">
<!--    异常发生时设置默认的异常处理页面(error是一个视图名)    -->
        <property name="defaultErrorView" value="error"/>
<!--    异常发生时,设置异常的变量名    -->
        <property name="exceptionAttribute" value="ex"/>
<!--    设定自定义异常与页面的映射    -->
        <property name="exceptionMappings">
            <props>
                <!--   key:自定义异常对象的路径,标签中设置具体的处理页面的视图名   -->
                <prop key="cn.ken.exception.BusinessException">buss_error</prop>
            </props>
        </property>
    </bean>
实现Spring的异常处理接口HandlerExceptionResolver自定义自己的异常处理器(推荐使用)
具有集成简单,有良好的扩展性,对代码没有入侵性
在异常处理时可以获取导致异常出现的对象,有利于提供更详细的异常处理信息
@Component
public class GlobalExceptionResolver implements HandlerExceptionResolver {
    /**
     *
     * @param request
     * @param response
     * @param handler 目标方法
     * @param ex 异常对象
     * @return
     */
    @Override
    public ModelAndView resolveException(HttpServletRequest request, HttpServletResponse response, Object handler, Exception ex) {
        ModelAndView modelAndView = new ModelAndView("error");
        modelAndView.addObject("ex","默认的异常信息");

        /*
         * 根据不同的异常执行不同的处理
         */
        if (ex instanceof BusinessException){
            BusinessException b = (BusinessException) ex;
            b.setCode(500);
            b.setMsg("这是业务异常");
            modelAndView.setViewName("buss_error");
            modelAndView.addObject("e",b);
            return modelAndView;
        }
        return modelAndView;
    }
}
使用@ExceptionHandler注解实现异常处理
具有集成简单,扩展性好(只需将需要异常处理的Controller类继承BaseController即可)不需要附加Spring配置等
但该方法对代码存在入侵性(需要修改已有代码,使相关类继承BaseController),在处理异常时不能获取除异常以外的数据
public class BaseController {

    @ExceptionHandler
    public String exceptionHandler(HttpServletRequest request, HttpServletResponse response, Exception e){
        request.setAttribute("ex","这是第三种异常处理");
        if(e instanceof BusinessException){
            return "buss_error";
        }
        return "error";
    }
}
public class AccountController extends BaseController{

}
未捕获异常处理
在web.xml中通过
<error-page>
<!--  如果出现404异常,则跳转到项目根路径下的404.jsp页面  -->
    <error-code>404</error-code>
    <location>/404.jsp</location>
</error-page>
<error-page>
    <exception-type>java.lang.Throwable</exception-type>
    <location>/500.jsp</location>
</error-page>
<error-page>
    <error-code>500</error-code>
    <location>/500.jsp</location>
</error-page>
三、MyBatis
1、MyBatis的特点
属于持久层ORM框架
- 持久层:将内存中的对象数据转移到数据库中的过程
- MyBatis、Hibernate、Spring-jpa
- ORM(Object Relational Mapping):对象关系映射框架
- 类<=>表
- 属性<=>字段
- 对象<=>记录
- MyBatis半自动化
- 表需要手动设计
- 需要提供sql
- 依赖于数据库平台
- 优点:使用灵活,学习成本低(基于原生jdbc封装),优化灵活,适合做互联网项目
2、Mapper接口开发
遵循以下规范:
- Mapper.xml文件中的namespace与mapper接口的全限定名一致
- Mapper接口方法名与Mapper.xml中定义的每个Statement的id一致
- Mapper接口方法的输入参数类型与Mapper.xml中定义的每个sql的parameterType类型相同
- Mapper接口方法的输出参数类型与Mapper.xml中定义的每个sql的resultType类型相同
3、动态SQL
<?xml version="1.0" encoding="UTF-8" ?>
<!DOCTYPE mapper PUBLIC "-//mybatis.org//DTD Mapper 3.0//EN"
        "http://mybatis.org/dtd/mybatis-3-mapper.dtd">
<mapper namespace="cn.ken.dao.UserDao">
<!--  sql语句的抽取  -->
    <sql id="selectUser">select * from user</sql>

    <select id="selectByConditions" parameterType="cn.ken.pojo.User" resultType="cn.ken.pojo.User">
        <include refid="selectUser"></include>
        <where>
            <if test="username!=null">
                and username = #{username}
            </if>
            <if test="id!=0">
                and id = #{id}
            </if>
            <if test="password!=null">
                and password = #{password}
            </if>
        </where>
    </select>

    <select id="selectByIds" parameterType="list" resultType="User">
        <include refid="selectUser"></include>
        <where>
            <foreach collection="list" item="id" open="id in(" close=")" separator=",">
                #{id}
            </foreach>
        </where>
    </select>
</mapper>
4、Mybatis核心配置文件深入
TypeHandlers标签(类型处理器)
你可以重写类型处理器或创建你自己的类型处理器(如把java的Date类型转换为毫秒值存储到数据库的BIGINT类型),具体做法为:实现TypeHandler接口或继承BaseTaypeHandler类,然后可以选择性地将它映射到一个JDBC类型。
开发步骤:
- 定义转换类继承类BaseTypeHandler
- 覆盖4个未实现的方法,其中setNonNullParameter为java程序设置数据到数据库的回调方法,getNullableResult为查询时mysql的字符串类型java的Type类型的方法
- 在Mybatis核心配置文件中注册
- 测试转换是否正确
<!--mybatis.xml-->
<!--注册类型处理器-->
<typeHandlers>
    <typeHandler handler="cn.ken.handler.DateTypeHandler"/>
</typeHandlers>
public class DateTypeHandler extends BaseTypeHandler<Date> {

    //将java类型转换为数据库类型
    @Override
    public void setNonNullParameter(PreparedStatement preparedStatement, int i, Date date, JdbcType jdbcType) throws SQLException {
        long time = date.getTime();
        preparedStatement.setLong(i, time);
    }

    //根据名称将数据库中的类型转换java类型
    @Override
    public Date getNullableResult(ResultSet resultSet, String s) throws SQLException {
        long aLong = resultSet.getLong(s);
        return new Date(aLong);
    }

    //根据列数
    @Override
    public Date getNullableResult(ResultSet resultSet, int i) throws SQLException {
        long along = resultSet.getLong(i);
        return new Date(along);
    }

    //存储过程
    @Override
    public Date getNullableResult(CallableStatement callableStatement, int i) throws SQLException {
        long along = callableStatement.getLong(i);
        return new Date(along);
    }
}
plugins标签
MyBatis可以使用第三方插件来对功能进行扩展,分页助手PageHelper是将分页的复杂操作进行封装,使用简单的方式即可获得分页的相关数据
开发步骤:
- 导入通用的PageHelper的坐标
- 在mybatis核心配置文件中配置PageHelper插件
- 测试分页数据获取
<dependency>
  <groupId>com.github.pagehelper</groupId>
  <artifactId>pagehelper</artifactId>
  <version>5.2.0</version>
</dependency>
<dependency>
  <groupId>com.github.jsqlparser</groupId>
  <artifactId>jsqlparser</artifactId>
  <version>3.2</version>
</dependency>
<plugins>
    <plugin interceptor="com.github.pagehelper.PageInterceptor">
        <property name="helperDialect" value="mysql"/>
    </plugin>
</plugins>
//设置分页相关参数,当前页+每页显示条数
PageHelper.startPage(2,3);
List<User> userList = mapper.findAll();
//获得与分页相关参数
PageInfo<User> pageInfo = new PageInfo<User>(userList);
pageInfo.getPageNum();
pageInfo.getPageSize();
pageInfo.getTotal();
pageInfo.getPages();
pageInfo.isFirstPage();
pageInfo.isLastPage();
5、多表操作
一对一
<mapper namespace="cn.ken.dao.OrderDao">

    <resultMap id="orderMap" type="cn.ken.pojo.Order">
        <!--
            手动指定字段与实体属性的映射关系
            column:数据表的字段名字
            property:实体的属性名称
        -->
        <id column="oid" property="id"/>
        <result column="name" property="name"/>
<!--        <result column="uid" property="user.id"/>-->
<!--        <result column="username" property="user.username"/>-->
<!--        <result column="password" property="user.password"/>-->
        <!--
            property:当前实体(order)中的属性名(private User user)
            javaType:当前实体(order)中的属性类型
        -->
        <association property="user" javaType="cn.ken.pojo.User">
            <id column="uid" property="id"/>
            <result column="username" property="username"/>
            <result column="passwird" property="password"/>
        </association>
    </resultMap>

    <select id="selectAll" resultMap="orderMap">
        SELECT *, o.id oid FROM `orders` o,`user` u WHERE o.uid = u.id
    </select>
public class Order {
    private Long id;
    private String name;
    //连接通过对象而不是uid
    private User user;
}
一对多
<mapper namespace="cn.ken.dao.UserDao">
<!--  sql语句的抽取  -->

    <resultMap id="userMap" type="cn.ken.pojo.User">
        <id column="uid" property="id"/>
        <result column="username" property="username"/>
        <result column="password" property="password"/>
        <!--
            property:集合名称
            ofType:集合类型
        -->
        <collection property="orderList" ofType="cn.ken.pojo.Order">
            <id column="oid" property="id"/>
            <result column="name" property="name"/>
        </collection>
    </resultMap>

    <select id="selectAll" resultMap="userMap">
        select *, o.id oid from user u, orders o where u.id = o.uid
    </select>
public class User {
    private Long id;
    private String username;
    private String password;
    private List<Order> orderList;
}
多对多(建立中间表)
<resultMap id="roleMap" type="cn.ken.pojo.User">
    <id column="uid" property="id"/>
    <result column="username" property="username"/>
    <result column="password" property="password"/>
    <collection property="orderList" ofType="cn.ken.pojo.Role">
        <id column="roleId" property="id"/>
        <result column="roleName" property="roleName"/>
        <result column="roleDesc" property="roleDesc"/>
    </collection>
</resultMap>

<select id="selectAllRole" resultMap="roleMap">
    select * from user u, role r, user_role ur, where u.id = ur.userId and r.id = ur.roleId
</select>
6、注解开发
- @Insert(“sql语句”)
- @Update(“sql语句”)
- @Delete(“sql语句”)
- @Select(“sql语句”)
Q.E.D.

